Google has unleashed the Android 6.0 Marshmallow update for Nexus devices, which means it will eventually hit all devices as an over-the-air (OTA) update. Unfortunately, that could take several weeks, which can feel like an eternity. The good news is that you can download the official OTA update straight from Google and manually install it yourself.
This might seem like a daunting task, so that’s why we put together this complete guide explaining exactly how it’s done. Just follow the steps outlined below, and you will be enjoying Marshmallow goodness in no time. You can even follow the same steps to install subsequent Android Marshmallow updates when they come out. We will add those update links as they get released, so be sure to bookmark this page for future reference.
Updated on 06-15-2016 by Robert Nazarian: Added in OTA links for the June 2016 security update for all supported Nexus devices, as well as the Pixel C.
There are actually two ways to manually update your Nexus device. The first option is to flash the factory image, which is like installing the complete Android software and firmware from scratch. This isn’t a bad way to go, but it requires a factory reset if your bootloader isn’t unlocked. You can check out our complete instructions for flashing the factory image here.
The second method is installing the OTA update, which is what this guide is about. This is the same exact update that Google will automatically send to your device at some point in the future. The only difference is that you will get it right away if you follow the steps below. We like this method, since a factory reset isn’t required. This means that you won’t lose your data, but we cannot stress enough how important it is that you back up all your important data in case something goes wrong. So please make sure everything is backed up before proceeding.
Installing ADB and Fastboot
In order to send the OTA update to your Nexus device, you must have ADB and Fastboot installed on your desktop computer. ADB stands for Android Debug Bridge and it allows you to send commands to your Android device over USB through a terminal/command-line interface such as Windows Command Prompt. Fastboot allows you to flash images to your Android device. You don’t need Fastboot for these instructions, but we figured it deserved a mention, since it comes packaged together with ADB.
There are two methods to getting ADB and Fastboot on your computer. The first is to download and install the Android SDK tools from the Android developer site. This method will work for Windows, Mac, and Linux machines. If you’re a Windows user, you can download and install Minimal ADB and Fastboot instead, which is actually the easiest method. However, we recommend installing the Android SDK tools because it will also give you the Google USB drivers at the same time, which you will need in order for your computer to recognize your Nexus device. If you do decide to install Minimal ADB and Fastboot, you can still download the Google USB drivers separately. We will show you how to do that later.
Follow the instructions below for either installing the Android SDK tools or Minimal ADB and Fastboot.
Download and install the Android SDK tools
- Click here to download and install the Android SDK Tools from Google’s developer site. There are choices for Windows, Mac, and Linux. These instructions are for Windows machines.
- When asked what directory to install the software to, we recommend that you set it to C:android-sdk. If you choose a different location, just make sure you remember it.
- Once the Android SDK Tools are installed, launch it from the Start Menu.
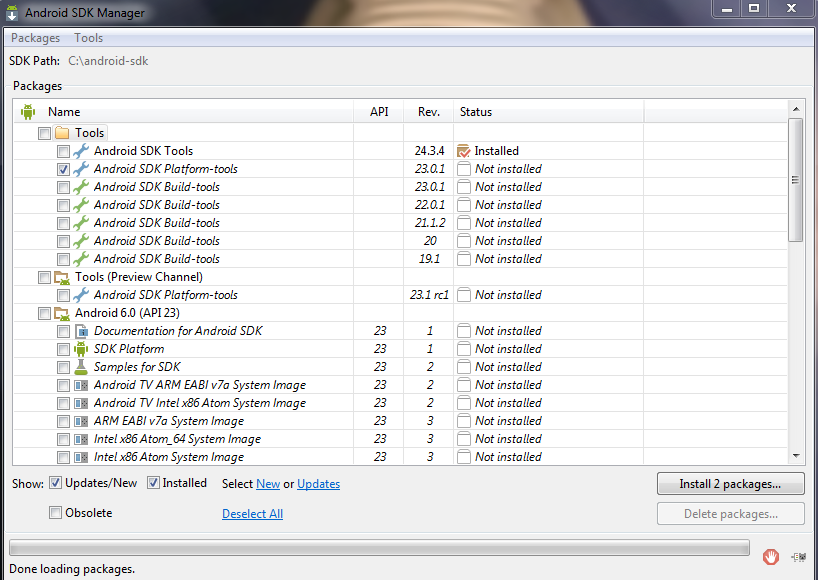
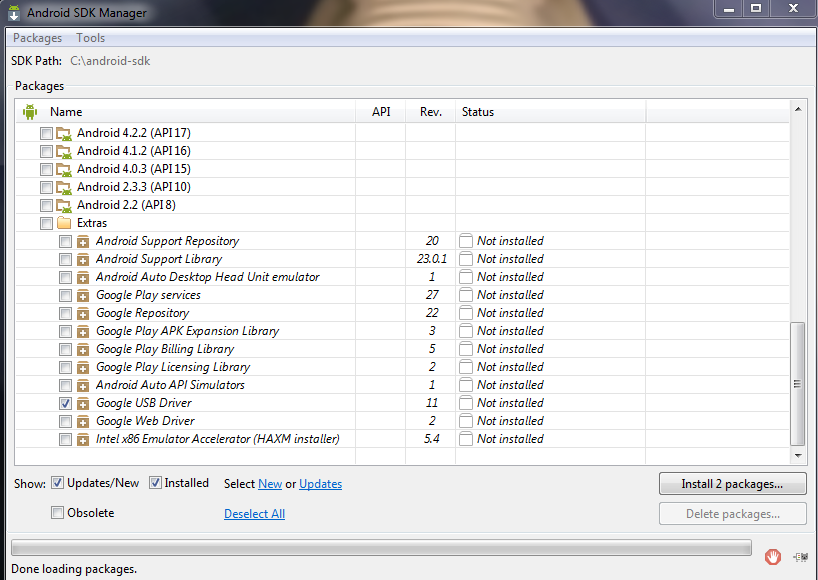
- The SDK Manager will open. Just uncheck everything except Android SDK Platform-tools and Google USB Driver. Android SDK Platform-tools is at the top and Google USB Driver is toward the bottom.
- Click on Install 2 packages at the bottom right.
- Check Accept license and click Install.

ADB and Fastboot will now reside in the C:android-sdkplatform-tools folder if you followed step 2 as outlined. If you chose a different directory, than ADB and Fastboot will reside in the platform-tools folder under whatever location you chose to install the Android SDK Tools to in step 2.
Download and install Minimal ADB and Fastboot
- Click here to download minimal_adb_fastboot_v1.3.1_setup.exe from the XDA forums. Note: the version number could be different if a newer version is released after this post has been published.
- Launch the minimal_adb_fastboot_v1.3.1_setup.exe file.
- When asked what directory to install the software to, we recommend that you set it to C:android-sdkplatform-tools since we will be using that location for the rest of this guide. If you choose a different location, just make sure you remember it.
Download the over-the-air (OTA) update zip file for your device
Now it’s time to download the appropriate OTA zip file for your device and place it in the folder where ADB and Fastboot is. If you followed our instructions in the Installing ADB and Fastboot section, it’s in the C:android-sdkplatform-tools folder.
Important: You want to make sure that your device is currently on the “From” Build Number that’s listed for each device. To see that, just open Settings > About Phone and scroll down to About Phone. Now scroll down to the bottom and look at the Build Number. Make sure it matches the “From” listed below for the device that you’re upgrading. If you didn’t receive a security update that rolled out before the Android version update you want to install, be sure to download and install that first.
The zip file will have a rather large name, so feel free to rename it, so you don’t have to type out the entire file name in the CMD Window. Alternatively, you can paste it in the CMD prompt window by pressing ALT and the spacebar, then choose Edit before selecting Paste.
Google started posting the official OTA links on its developer website in May 2016. We also have the download links for each device below for your convenience.
Download the appropriate OTA zip file from one of the links below for your device, and make sure to place it in the folder where ADB and Fastboot is.
Note: As a final reminder please make sure your current version number matches up with the “From” build in both the descriptions below and actual file names. You’ll also notice that there are multiple version build update links for some devices since not everyone receives the security update before receiving version builds. This means you can install a previous monthly security update at the same time as an Android version update.
Nexus 5 (hammerhead)
- From LMY48M (5.1.1) To MRA58K (6.0)
- From MRA58K (6.0) To MRA58N (6.0) November Security Update
- From MRA58N (6.0) To MMB29K (6.0.1)
- From MMB29K (6.0.1) To MMB29S (6.0.1) January 2016 Security Update
- From MMB29S (6.0.1) To MMB29Q (6.0.1) February 2016 Security Update
- From MMB29Q (6.0.1) To MMB29V (6.0.1) March 2016 Security Update
- From MMB29V (6.0.1) To MOB30D (6.0.1) April 2016 Security Update
- From MMB29X (6.0.1) To MOB30D (6.0.1) April 2016 Security Update
- From MOB30D (6.0.1) To MOB30H (6.0.1) May 2016 Security Update
- From MOB30H (6.0.1) To MOB30M (6.0.1) June 2016 Security Update
Nexus 5X (bullhead)
- From MDB08L (6.0) To MMB29K (6.0.1)
- From MDB08M (6.0) To MMB29K (6.0.1)
- From MMB29K (6.0.1) To MMB29P (6.0.1) January 2016 Security Update
- From MMB29P (6.0.1) To MMB29Q (6.0.1) February 2016 Security Update
- From MMB29Q (6.0.1) To MHC19J (6.0.1) March 2016 Security Update
- From MHC19J (6.0.1) To MHC19Q (6.0.1) April 2016 Security Update
- Fom MHC19Q (6.0.1) To MTC19T (6.0.1) May 2016 Security Update
- From MTC19T (6.0.1) To MTC19V (6.0.1) June 2016 Security Update
Nexus 6 (shamu)
- From LMY48M (5.1.1) To LMY48T (5.1.1) October Security Update
- From LMY48T (5.1.1) To MRA58K (6.0)
- From MRA58K (6.0) To MRA58N (6.0) November Security Update
- From MRA58K (6.0) To MMB29K (6.0.1)
- From MRA58N (6.0) To MMB29K (6.0.1)
- From MRA58R (6.0) To MMB29K (6.0.1)
- From MRA58X (6.0) To MMB29K (6.0.1)
- From MMB29K (6.0.1) To MMB29S (6.0.1) January 2016 Security Update
- From MMB29S (6.0.1) To MMB29Q (6.0.1) February 2016 Security Update
- From MMB29Q (6.0.1) To MMB29V (6.0.1) March 2016 Security Update
- From MMB29V (6.0.1) To MMB29X (6.0.1) April 2016 Security Update
- From MMB29X (6.0.1) To MMB30G (6.0.1) May 2016 Security Update
- From MOB30D (6.0.1) To MOB30I (6.0.1) May 2016 Security Update
- From MMB30G (6.0.1)To MMB30J (6.0.1) June 2016 Security Update
- From MOB30I (6.0.1) To MOB30M (6.0.1) June 2016 Security Update
Nexus 6 (shamu) Project Fi version
- From LVY48F (5.1.1) To LVY48H (5.1.1) October Security Update
- From LVY48H (5.1.1) To MRA58K (6.0)
- 6.0.1 Link Coming Soon
Nexus 6 (shamu) AT&T version
- From LMY48M (5.1.1) To LMY48W (5.1.1) October Security Update
- From LMY48Y (5.1.1) To LMY48Z (5.1.1) December Security Update
- From LMY48W (5.1.1) To MRA58K (6.0) (Link coming soon)
- 6.0.1 Link Coming Soon
Nexus 6 (shamu) T-Mobile version
- From LYZ28K (5.1.1) To LYZ28M (5.1.1) October Security Update
- From LYZ28M (5.1.1) To MRA58K (6.0)
- From MRA58K (6.0) To MMB29K (6.0.1)
- From MRA58X (6.01) To MMB29K (6.0.1)
Nexus 6P (angler)
- From MDB08L (6.0) To MMB29M (6.0.1)
- From MDB08M (6.0) To MMB29M (6.0.1)
- From MMB29M (6.0.1) To MMB29P (6.0.1) January 2016 Security Update
- From MMB29N (6.0.1) To MMB29P (6.0.1) January 2016 Security Update
- From MMB29P (6.0.1) To MMB29Q (6.0.1) February 2016 Security Update
- From MMB29Q (6.0.1) To MHC19I (6.0.1) March 2016 Security Update
- From MMB29V (6.0.1) To MHC19I (6.0.1) March 2016 Security Update
- From MHC19I (6.0.1) To MHC19Q (6.0.1) April 2016 Security Update
- From MHC19Q (6.0.1) To MTC19T (6.0.1) May 2016 Security Update
- From MTC19T (6.0.1) To MTC19V (6.0.1) June 2016 Security Update
Nexus 7 (2013) Wi-Fi (razor)
- From LMY48M (5.1.1) To MRA58K (6.0)
- From MRA58K (6.0) To MRA58U (6.0) November Security Update
- From MRA58U (6.0) To MRA58V (6.0) 2nd November Security Update
- From MRA58V (6.0) To MMB29K (6.0.1)
- From MMB29K (6.0.1) To MMB29O (6.0.1) January 2016 Security Update
- From MMB29O (6.0.1) To MMB29Q (6.0.1) February 2016 Security Update
- From MMB29Q (6.0.1) To MMB29V (6.0.1) March 2016 Security Update
- From MMB29V (6.0.1) To MOB30D (6.0.1) April 2016 Security Update
- From MOB30D (6.0.1) To MOB30J (6.0.1) May 2016 Security Update
- From MOB30J (6.0.1) To MOB30M (6.0.1) June 2016 Security Update
Nexus 7 (2013) LTE (razorg)
- From LMY48M (5.1.1) To MRA58K (6.0)
- From MRA58K (6.0) To MRA58V (6.0) November Security Update
- From MRA58V (6.0) To MMB29K (6.0.1)
- From LMY48Z (5.1.1) To MMB29O (6.0.1) January 2016 Security Update
- From MMB29K (6.0.1) To MMB29O (6.0.1) January 2016 Security Update
- From MRA59B (6.0.1) To MMB29O (6.0.1) January 2016 Security Update
- From MMB29O (6.0.1) To MMB29Q (6.0.1) February 2016 Security Update
- From MMB29Q (6.0.1) To MMB29V (6.0.1) March 2016 Security Update
- From MMB29V (6.0.1) To MOB30D (6.0.1) April 2016 Security Update
- From MMB29V (6.0.1) To MMB29X (6.0.1) April 2016 Security Update
- From MOB30D (6.0.1) To MOB30J (6.0.1) May 2016 Security Update
- From MOB30J (6.0.1) To MOB30M (6.0.1) June 2016 Security Update
Nexus 9 Wi-Fi (volantis)
- From LMY48M (5.1.1) To LMY48T (5.1.1) October Security Update
- From LMY48T (5.1.1) To MRA58K (6.0)
- From MRA58K (6.0) To MRA58N (6.0) November Security Update
- From MRA58N (6.0) To MMB29K (6.0.1)
- From MMB29K (6.0.1) To MMB29S (6.0.1) January 2016 Security Update
- From MMB29S (6.0.1) To MMB29R (6.0.1) February 2016 Security Update
- From MMB29R (6.0.1) To MMB29V (6.0.1) March 2016 Security Update
- From MMB29V (6.0.1) To MOB30D (6.0.1) April 2016 Security Update
- From MOB30D (6.0.1) To MOB30G (6.0.1) May 2016 Security Update
- From MOB30G (6.0.1) To MOB30M (6.0.1) June 2016 Security Update
Nexis 9 LTE (volantisg)
- From LMY48M (5.1.1) To LMY48T (5.1.1) October Security Update
- From LMY48T (5.1.1) To MRA58K (6.0)
- MRA58K (6.0) To MRA58N (6.0) November Security Update
- MRA58N (6.0) To MMB29K (6.0.1)
- From MMB29K (6.0.1) To MMB29S (6.0.1) January 2016 Security Update
- From MMB29S (6.0.1) To MMB29R (6.0.1) February 2016 Security Update
- From MMB29R (6.0.1) To MMB29V (6.0.1) March 2016 Security Update
- From MMB29V (6.0.1) To MOB30D (6.0.1) April 2016 Security Update
- From MOB30D (6.0.1) To MOB30G (6.0.1) May 2016 Security Update
- From MOB30G (6.0.1) To MOB30M (6.0.1) June 2016 Security Update
Nexus Player (fugu)
- From LMY48N (5.1.1) To MRA58K (6.0)
- From MRA58K (6.0) To MRA58N (6.0) November Security Update
- From MRA58N (6.0) To MMB29M (6.0.1)
- From MMB29M (6.0.1) To MMB29T (6.0.1) January 2016 Security Update
- From MMB29T (6.0.1) To MMB29U (6.0.1) February 2016 Security Update
- From MMB29U (6.0.1) To MMB29V (6.0.1) March 2016 Security Update
- From MMB29V (6.0.1) To MOB30D (6.0.1) April 2016 Security Update
- From MOB30D (6.0.1) To MOB30G (6.0.1) May 2016 Security Update
- From MOB30G (6.0.1) To MOB30M (6.0.1) June 2016 Security Update
Pixel C (dragon_ryu)
- From MXB48J (6.0.1) To MXB48T (6.0.1) February 2016 Security Update
- From MXB48T (6.0.1) To MXC14G (6.0.1) March 2016 Security Update
- From MXC14G (6.0.1) To M5C14J (6.0.1) April 2016 Security Update
- From M5C14J (6.0.1) To MXC89F (6.0.1) May 2016 Security Update
- From MXC89F (6.0.1) To MXC89H (6.0.1) June 2016 Security Update
Nexus 10 (mantaray) – security updates only
- From LMY48Z (5.1.1) To LMY49F (5.1.1) January 2016 Security Update
- From LMY49F (5.1.1) To LMY49G (5.1.1) February 2016 Security Update
- From LMY49G (5.1.1) To LMY49H (5.1.1) March 2016 Security Update
- From LMY49H (5.1.1) To LMY49J (5.1.1) April 2016 Security Update
- No longer supported
**Nexus 4, Nexus 7 (2012), and Nexus 10 devices will not be updated to Marshmallow.
Enable USB debugging and connect your Nexus device via USB to your desktop

Now you need to make sure USB debugging is enabled on your Nexus device. Open Settings on your Nexus device. If you do not see Developer Options toward the bottom of the Settings screen on your device, follow these steps to activate them.
- Tap on About Phone and find the Build Number.
- Tap on the Build Number seven times and the Developer Options will appear on the main page of the Settings.
- Tap on the Back key to see the Developer Options.
- Tap on Developer Options.
- Check to enable USB Debugging.
Before you connect your device to the USB port on your computer, you want to make sure you have the appropriate drivers installed. You should be all set if you opted to install the Android SDK Tools. If you instead chose to install Minimal ADB and Fastboot, you can grab them here. Since you’re working with a Nexus device, you specifically want the Google USB Drivers. The download will be a zip file, so extract the contents where you wish, and remember the location.
Now connect your device via a USB cable and you are ready to flash the zip file that you extracted earlier. If you’re connecting your Nexus device to your computer for the first time, you will get a popup box on your Nexus device stating what the computer’s RSA Key is. Just check Always Allow From This Computer and tap on OK.

If your Nexus device doesn’t show the RSA key popup, then open the notification panel and select USB For Charging Only and change the mode to Transfer Photos (PTP).

If your Nexus device still doesn’t show the RSA key popup, then follow these instructions:
- On your Windows desktop, go to your Control Panel then Device Manager.
- You should see your Nexus device under Other Devices with a Yellow ! mark on it.
- Right-click on it and select update driver.
- Choose Browse my computer for driver software, and choose the directory where the Google USB Drivers are. If you chose to install the Android SDK tools and followed our instructions, they should be in the C:android-sdkextrasgoogleusb driver folder. If you chose to manually download the Google USB drivers, just navigate to the folder that you archived the contents of the Zip file in.
If your Nexus device still doesn’t show the RSA key approval popup, then open the command prompt on your desktop and navigate to the folder where ADB and Fastboot reside. If you followed our instructions from the Installing ADB and Fastboot section, it will be in the C:android-sdkplatform-tools folder. Just type cdandroid-sdkplatform-tools at the command prompt in Windows. If ADB and Fastboot are somewhere else, just navigate to that location instead.
Type “ADB devices” and you should get the following result:

The RSA key approval popup should now be visible on your Nexus device. Just check Always Allow From This Computer and tap OK.
Type “ADB devices” again, and you should get the following result with a different device key:

You are now ready to install the OTA update.
Install the over-the-air (OTA) update
- Open the Command Prompt in Windows or Terminal on a Mac and navigate to the folder that ADB and Fastboot are installed in. Again, if you followed our instructions from the Installing ADB and Fastboot section, it will be in the C:android-sdkplatform-tools folder. Just type “cdandroid-sdkplatform-tools” at the prompt in Windows. If ADB and Fastboot are somewhere else, just navigate to that location instead. To make things easier, so you don’t have to type out long directories, you can also paste it by pressing ALT and the spacebar, then choose Edit before selecting Paste.
If you’re using a Mac, you need to add the platform tools directory to your $PATH. In terminal, type “sudo nano/etc/paths”. Now enter your password and go to the bottom of the file and enter the full path of the “platform tools” directory. Hit control-x to quit and enter Y to save.
The following ADB commands are for Windows machines. If you’re using a Mac, just add “./” before each command, for example: “./adb reboot bootloader”.
- Assuming you device is already connected to your computer via USB and USB Debugging is enabled, you need to re-start it in fastboot mode. Follow one of the two methods below. Option A may be preferable because it’s another confirmation that your computer recognizes your Nexus device.
A) Type “adb reboot bootloader”
B) Turn your device off, then turn it back on while holding down the relevant key combinations for your device. For many devices it’s Volume Up + Volume Down + Power. You can see what your device’s key combinations are here.
- The fastboot menu will appear and you should see Start in the top right. Press Volume Up till it changes to Recovery. Press the Power button to select it.
- You will see an Android with a red exclamation point icon, press and hold the Power key, then press the Volume up key to show the Recovery Menu.
- You will get a new menu. Navigate to apply update from adb and select it by pressing the Power button.
- In the command window — make sure you are in the directory where ADB and Fastboot reside — type: “adb sideload [the full name of the file].zip” without the brackets around the file name.
- The update will install and reach 100 percent.
- Reboot and enjoy the latest version of Android Marshmallow.
Previous Updates:
Updated on 05-11-2016 by Robert Nazarian: Added in OTA links for the May 2016 security update for all supported Nexus devices, as well as the Pixel C.
Updated on 04-12-2016 by Robert Nazarian: Added in OTA links for the April 2016 security update for all supported Nexus devices, as well as the Pixel C.
Updated on 03-10-2016 by Robert Nazarian: Added in OTA links for the March 2016 security update for all supported Nexus devices, as well as the Pixel C.
Updated on 02-05-2016 by Robert Nazarian: Added in OTA links for the January and February 2016 security updates for all supported Nexus devices. Also added categories for the Pixel C and Nexus 10 (security updates only).
Updated on 01-08-2016 by Robert Nazarian: Added in OTA 6.0.1 links for all supported Nexus devices
Updated on 12-15-2015 by Robert Nazarian: Added in links for November security update as well as 6.0.1 OTA links for most Nexus devices.
Updated on 10-16-2015 by Robert Nazarian: Added new OTA links for Nexus 6 devices.

